Pages

Saturday, May 6, 2017

Ending the School Year With Class


Planning the end of the year activities can be daunting. Just thinking about it makes me want to hide! But...whether you have a kinder class or 6th grade, or any grade, an end of the year party is unavoidable. The best tip to an end of the year party is to do it two or three days before the last day of school. Or, if you like to party...

For the past 5 years, I have had an End of the Year Week! The kids love it and you'll love it too!

This is what I normally do every year, but I do try to get my students' input on what they want as well.


All you have to do is vote on the top 5 fun activities your kiddos want to participate in and, voila! last week is done! (And planned!) It's easy! Here are some ideas of what you can do.


1. Pajama Day 
2. Technology Day- Bring any device
3. Sports Day/Field Day 
4. Movie Day
5. Game Board Day
6. Reading Day
7. Art Day
8. Centers Day
9. Paint Day 
10. Minute To Win It Day
11. Memory Book/Scrapbook Day
12. Beach/Bubbles/Get Wet Day
13. Camping Day
14. "Plan your own" Day


You can even combine a couple of these, like Pajama-Movie Day. Or, you can have a Game Board-Field/Grass Area Day. 

Once you have come up with your top 5, then you can prepare the flyers. Here is a quick and easy editable flyer sheet you can use. Just click HERE to get it! It's available in both Spanish and English.


Happy end of the year time! I've only got 5 more weeks to go... But the last is our FUN End of The Year Week one! 


My Secret Letter

a Rafflecopter giveaway

Saturday, February 18, 2017

Celebrating 2,000 with Brinca into Bilingual (Mrs.Nicolau)!

How exciting! 


My friend Mrs. Nicolau from Brinca into Bilingual just achieved a tremendous milestone and she wants to celebrate it with you by giving you lots and lots of wonderful goodies! Enter to win!!

GIVEAWAY TIME!!!
ALL GIVEAWAYS WILL RUN FROM SATURDAY 18TH (6AM CT) UNTIL TUESDAY 21ST (12AM CT)


Mrs. Nicolau is giving away TWO RAE DUNN MUGS!

These cute mugs are very hard to find (depending where you live) and everyone is going CRAZY for these!


Let's giveaway a gift card!! Enter the Rafflecopter for a chance to win a $25 TPT Giftcard! Remember the more entries you have, the more changes you have to win!!!


Who does not LOVE TARGET?! We ALL do!!  So let's do a giveaway for a $25 Target giftcard!


Since we are going crazy with prices, why don't we get even crazier?!... Let's also celebrate with a $21.00 gift card from the AMAZING Melonheadz!


Last, but definitely not least! I have many blog friends that have joined me to celebrate this amazing event! They have all joined me to giveaway bundles by grades!!!

The first bundle is for our Bilingual K-1 teachers!


Next is the 2-3 Bilingual Bundle!

Last is our K-2 Grades Bundle in English!


Are you excited enough?! We sure hope so! Stop by Mrs. Nicolau's blog to enter on all these great prizes!!!
While you are there, drop a note to her. She LOVES hearing from her readers! :)


Sunday, January 22, 2017

Spanish Classroom Library GIVEAWAY!

Hi everyone! Are you ready for an awesome giveaway to start the year?!
Enter to win a Spanish Book set for your classroom. Just click on the link to enter.

Monday, February 1, 2016

President Time Line Box Report

February is the time of year when I have my students create time lines for two very well know Presidents: George Washington and Abraham Lincoln. And what better way to do it, than on a box report. A what? A box report! Here is how its made:

1. To make the box, you'll need a 12 x12 square sheet of paper. Fold it in half diagonally both ways.

2. Fold each corner to the center.

3. Fold one edge to the center, unfold and fold the next edge. Do this to all four edges.

4. If you flip it over, you should have a 4 x 4 grid.

5. Unfold on flap and cut on the dotted lines.

6. Overlap the two side pieces.

7. Fold the flap over the side pieces and repeat steps 5 and 6 on the opposite side.

8. Glue a strip of paper folded like an accordion inside the box.


You'll need to fold and do two boxes, one for the lid and the other for the bottom of the box. Or, you can do one box and use a larger image of the president you are writing about as a cover.


Your student will also need to create/fold an accordion with 8 folds to glue the time line facts in order.
For this, they:
-Take a 9 x 12 piece of construction paper and cut it in half the long way.

-Fold like an accordion 4 times. (I tell my students to fold in half two times and then refold "accordion-style." That way each fold is equal.)

-Glue two ends together.

-Glue one end of the accordion to the inside of a box and the other end to the other inside of the box.
-Glue the time line facts in order.


-Close the box, glue the image of George Washington to the top and the other on the bottom. Decorate the rest of the sides as desired.

To get the time line facts just click on the link below. 
Did I mention it was available in both Spanish and English? Well, it is! :)
I hope your students enjoy creating these box reports as much as mine! 


Happy President's Day!


Friday, January 1, 2016

Family Calendar

For the past 16 years I have been creating my family's calendar. I started back in 2001! Back then, only a few of my cousins were married, so the calendar was fairly simple. But now... Wowsers!! It's become quite a phenomenon! It started out with only 15 families. Granted, a few were for my single cousins, but none the less... Now, as I finish editing the 2016 calendar, I realized how beautiful and wonderful it has been for me to see, first hand, how our family has grown. I tear up just thinking about it. 
First ever calendar from 2001
I now make it for 25 families! Back in 2001, it started out with 48 members. Now, we have 137!! Oh my! I had not realized how many relatives (by blood or marriage) had become a part of this tradition. No wonder I take for ever to do it every year. Hahaha! 
Past calendars: You can see how the family has grown!
My family has become so accustomed to this calendar, that by the end of December, during our Posadas (our 9 day Mexican recreation of Mary and Joseph's arduous journey to Nazareth,) they begin reminding me if I'd already begun the calendar. 

And so, I'd like to share with you this wonderful tradition with you of creating your very own family's calendar. All you have to do is enter your family member's birthdays and/or anniversaries. Once done, print and bind it. I print at home and bind at my work. I buy the binding strips at Staples.


I am sharing it on PowerPoint so you can edit it. I used to create it on Calendar Maker, but began doing it on PPT last year. It's sooo much easier. Here is a sample of what my calendar pages look like. (FYI: I make my calendar in Spanish, but I've included the English version for you as well.)


To get your family calendar template, click: HERE.


I hope you enjoy creating and making it a family tradition as I have.

Happy New Year!! And God bless!!

-Hilda


Monday, November 30, 2015

Farmer in the Dell - Sentence Patterning Board

Teaching parts of speech can get pretty boring and redundant after a while. So why not make it more fun?!
For every unit that I teach, I include a "Farmer in the Dell" sentence patterning chart. Farmer in the Dell is from GLAD (Guided Language Acquisition and Design.) These are charts that include separate columns for adjectives, nouns, verbs, adverbs, and prepositional phrases. The teacher and students combine words from the charts to make sentences and "sing" the sentences to the tune of Farmer in the Dell.
It's easy to make and it does wonders in teaching parts of speech in the present, future, and past tense and more! Try it!

As you can see from the photos above, once you write down the student responses, you can manipulate the prepositional phrase column by cutting it and placing it at the beginning of the chart. This allows students to see how a sentence can be written in different ways.

For the holidays, (or any holiday) you and your students can create a sentence patterning chart for any noun!
Topics, for example can be: Santa, elf, gift, tree, reindeer, candy cane, stocking, etc. Have fun with it! I'm sure your students will get a kick out or singing, "Huge and furry candy canes
Huge and furry candy canes
Huge and furry candy canes  
run across the yard!"
Then they can draw it! How cool is that?! :)

I can't wait to do it in the month of December. I'm sure Grammar time will be much more fun when their working in partners giggling over "Large and bumpy elves swimming in the beach." Ha!

For a free Farmer in the Dell template (Spanish & English) click

Thursday, October 22, 2015

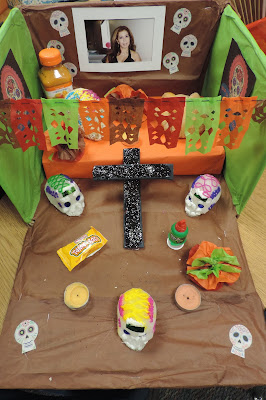
Altarcitos del Día de los muertos

     Nuestra clase estará aprendiendo sobre el Día de los muertos durante la semana de octubre 26 al 30 del 2015. Durante esa semana, los estudiantes tendrán la oportunidad de completar su tarea semanal o, hacer un altarcito del Día de los muertos. Esta opción se la doy a mis estudiantes por si acaso no celebren días festivos.

     El Día de los muertos es una celebración Mexicana. Aunque también se celebra en muchos países Latinoamericanos y ciudades con poblaciones de habla hispana, originó en México. El Día de los muertos honra a los difuntos del 1 de noviembre hasta el 2 de noviembre. 
     Durante el Día de los muertos, las familias decoran un altar. El altar es decorado con artículos especiales. Todos estos artículos, u objetos recuerdan a la persona.

     A los altares, le ponen una fotografía de la persona que están recordando. Junto a la foto, le ponen las comidas favoritas del ser querido. Decoran con papel picado, velas, flores de cempasúchil, pan de muerto y calaveras de azúcar y calacas.

     Tus estudiantes pueden tomar parte en esta tradición Latinoamericana al crear su propio altarcito y recordar a un ser querido que ya a fallecido.

     El propósito de esta actividad es para que tus estudiantes hablen con sus familiares y aprendan sobre sus antepasados. 

**Todos estos altarcitos fueron creados por mis estudiantes y sus familias el año pasado.**
Aquí están las instrucciones para que tus estudiantes hagan sus altarcito.
--------------------------------
Recuérdele a sus estudiantes que: 
Un altar es un espacio que se usa para recordar todas las cosas maravillosas sobre un ser querido que ya a muerto. Consiste de fotografías veladoras, flores, golosinas y comidas deliciosas. Estos obsequios son considerados ofrendas para los muertos que vienen a visitarnos en un día mágico.

Para hacer tu altar del Día de los muertos necesitas:
1.Caja de zapatos de cualquier tamaño
2.Papel para envolver tu caja
3.Fotos de tu ser querido
4.Artículos que le gustaban a tu ser querido –recuerda que cualquier cosa cuenta como ofrenda.
5.Una velita real o de LED
6.Flores de papel o ceda (opcional-pero las flores son una gran parte en la decoración del altar.)
Para armar tu altar:
1.Envuelve tu caja con el papel de envoltura. Es bonito usar papel de colores brillantes que le gustaban a tu ser querido.
2.Decora con las foto. Es bueno pegarlas adentro de la pared de la caja. Puedes usar palito de paletas para hacer marcos.
3.Agrega cualquier otro tipo de decoración. Usa cruces, signos religiosos si quieres, y también corazones y gemas.
4.Pon también comidas y golosinas como chocolates y papitas reales.
5.Finalmente, ponle unas velitas y las flores.
Espero y tus estudiantes disfruten de este proyecto tan memorable.